Useful Information
1. The Journey Begins – Lukla to the Hinku Valley
The adventure starts with the flight to Lukla. Once the luggage is checked and the team gathers, you leave the main Everest route and head east toward Paiya. The trail drops into forested hills, crossing small wooden bridges and passing through villages where life is simple and quiet. You slowly enter the lesser-known side of the Khumbu, walking under tall rhododendrons, moss-covered rocks, and long stretches of forest without crowds.
The path rises and falls as you move toward Chutanga. The air is fresh, and the landscapes feel more untouched. Trekking here gives a sense of isolation. You rarely see more than a few groups per day.
2. Crossing Zatrwa La – The Gateway to the Hinku
One of the first big challenges arrives early: Zatrwa La (roughly 4600 meters). It’s a steep climb from Chutanga, often windy at the top. The pass welcomes you with your first real view of the surrounding peaks.
Once you descend from the pass, the trail drops quickly into the Hinku Valley. Suddenly the terrain opens wide. Forests stretch along the valley floor, and high rocky walls rise steeply on both sides. The villages are small and simple, mostly shepherd huts and seasonal tea houses.
The walk to Thuli Kharka and then to Kothe is beautiful, passing through forests full of rhododendrons and birch, with the river flowing loudly beside the trail.
3. Climbing Through the Hinku Valley
From Kothe, the path slowly climbs toward Tangnag and Dingbo, areas that feel remote and peaceful. You walk along the Hinku River, guided by the tall south face of Mera Peak which grows larger every hour. The trail becomes open and grassy, and yak herders move quietly from one pasture to the next.
Tangnag (around 4300 meters) is your main acclimatization stop. The village is surrounded by long moraines, glacial lakes, and wide open space. Many teams take a rest day here and climb the ridge behind the village to get above 5000 meters for better acclimatization.
The air here is already thin, and the evenings get cold. But the views are incredible, especially during sunset when the western ridges light up in deep orange.
4. Toward Khare – Entering the High Alpine Zone
From Tangnag, you climb up a long moraine ridge toward Dig Glacier. The landscape becomes harsher. Rocks, ice, and scattered snow patches dominate. The sound of the river turns distant. After a steady climb, you reach Khare (around 4900 meters), the last settlement before you enter the glacier.
Khare is the main staging point for climbers. You spend at least one day here preparing the equipment: fitting crampons, checking ice axes, learning basic rope techniques, and walking practice on a snowy slope nearby. This training ensures everyone knows how to move safely on the Mera Glacier.
Evenings in Khare are quiet and cold. Trekkers gather in dining halls around a metal stove fueled with yak dung. The nights get windy, and the stars feel close enough to touch.
5. Climbing to Mera Base Camp and Mera La
After the preparation is complete, the team begins the push toward the glacier. The climb from Khare is steep at first, moving over rocky steps and snow-covered terrain. Soon you reach the lower part of the glacier, where you put on your harness and crampons.
The walk to Mera La is slow and steady. The glacier is wide and open, not steep, but the altitude makes everything feel heavier. Mera La (around 5400 meters) is a windy saddle between snow ridges, offering views down to the Hongu Valley on the other side.
Depending on the itinerary, some teams set up a Base Camp near Mera La, while others continue directly toward High Camp.
6. High Camp – Life Above 5800 Meters
Mera High Camp sits on a rocky ledge around 5800 meters. It is one of the most dramatic campsites in Nepal. On clear evenings, the views stretch across the entire Himalaya. The air is freezing even in peak season, and wind can sweep across the camp suddenly.
The camp is simple: a few tents set on flat platforms, a kitchen tent, and a narrow path between them. There is no running water, and tea is made by melting ice. Most climbers feel the altitude strongly here. Every step requires effort, and breathing becomes slow and heavy.
Dinner is served early, usually soup and something easy to digest. The team goes to bed right after sunset because the summit attempt begins before 3 AM.
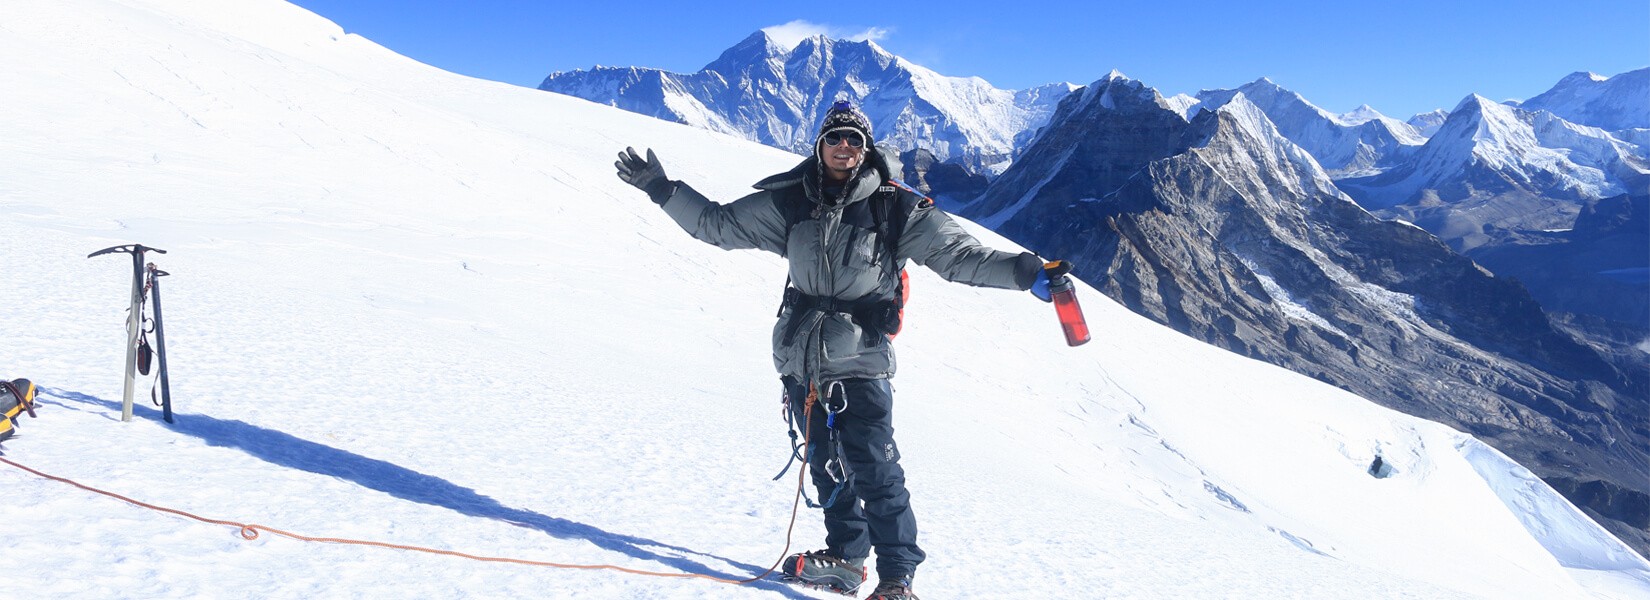
7. The Summit Push – A Long Night into a Golden Dawn
Summit day is long, steady, and unforgettable. You wake up in the dark, prepare your gear with numb fingers, drink hot tea, and step out into the icy air. The sky is full of stars, and the lights of headlamps form a line on the glacier.
The climb is gradual at first, following the central glacier. The snow crunches softly under your crampons. As you rise higher, the world behind you glows blue with the first light.
The final part before the summit is steeper. In most seasons, a fixed rope is set here. You clip in with your jumar and climb the last slope slowly.
When you reach the summit ridge, the view hits you all at once. Five of the world’s highest mountains stand in front of you:
- Everest
- Lhotse
- Makalu
- Cho Oyu
- Kangchenjunga
The horizon is filled with peaks as far as the eye can see. The world below looks calm and endless.
Climbers usually stay for a short time because of the wind and the cold. After photos and a quiet moment, you begin the descent back to High Camp and later to Khare.
8. Difficulty and Required Fitness
Mera Peak is not technical, but its altitude makes it challenging. Summit day can take 8 to 12 hours, depending on weather and fitness. You need:
- Strong legs
- Good endurance
- Ability to walk for long hours at high altitude
- Mental focus
- Basic comfort with cold conditions
Technical skills are minimal, and most climbers learn everything necessary during training in Khare.
9. Equipment Needed
You will need proper mountaineering equipment, including:
- Mountaineering boots
- Crampons
- Harness
- Helmet
- Ice axe
- Jumar and descender
- Warm down jacket
- Layered clothing
- Glacier sunglasses
- Heavy gloves
Most equipment can be rented in Kathmandu if needed.
10. Best Seasons for Climbing
Spring (March to May)
The glacier is generally stable, temperatures are moderate, and mornings are clear.
Autumn (September to November)
Crisp skies, excellent visibility, and colder but stable weather.
Climbing in winter or monsoon is possible only for experienced teams.
11. Accommodation and Meals
On the approach:
- Teahouses with basic rooms and warm meals
- Simple beds, solar lighting, and warm dining halls
On the mountain:
- Tents at Base Camp and High Camp
- Meals cooked by support staff
- Hot drinks served frequently to stay hydrated
12. Permits Required
For the climb, you need:
- Mera Peak climbing permit
The climb is gradual at first, following the central glacier. The snow crunches softly under your crampons. As you rise higher, the world behind you glows blue with the first light.
The final part before the summit is steeper. In most seasons, a fixed rope is set here. You clip in with your jumar and climb the last slope slowly.
When you reach the summit ridge, the view hits you all at once. Five of the world’s highest mountains stand in front of you:
- Everest
- Lhotse
- Makalu
- Cho Oyu
- Kangchenjunga
The horizon is filled with peaks as far as the eye can see. The world below looks calm and endless.
Climbers usually stay for a short time because of the wind and the cold. After photos and a quiet moment, you begin the descent back to High Camp and later to Khare.
8. Difficulty and Required Fitness
Mera Peak is not technical, but its altitude makes it challenging. Summit day can take 8 to 12 hours, depending on weather and fitness. You need:
- Strong legs
- Good endurance
- Ability to walk for long hours at high altitude
- Mental focus
- Basic comfort with cold conditions
Technical skills are minimal, and most climbers learn everything necessary during training in Khare.
9. Equipment Needed
You will need proper mountaineering equipment, including:
- Mountaineering boots
- Crampons
- Harness
- Helmet
- Ice axe
- Jumar and descender
- Warm down jacket
- Layered clothing
- Glacier sunglasses
- Heavy gloves
Most equipment can be rented in Kathmandu if needed.
10. Best Seasons for Climbing
Spring (March to May)
The glacier is generally stable, temperatures are moderate, and mornings are clear.
Autumn (September to November)
Crisp skies, excellent visibility, and colder but stable weather.
Climbing in winter or monsoon is possible only for experienced teams.
11. Accommodation and Meals
On the approach:
- Teahouses with basic rooms and warm meals
- Simple beds, solar lighting, and warm dining halls
On the mountain:
- Tents at Base Camp and High Camp
- Meals cooked by support staff
- Hot drinks served frequently to stay hydrated